It only takes a minute to create your own art work!
This is pretty amazing because 1) it’s quite beautiful really, and 2) it took less than one minute!
Source: Epic Win FTW.
Everything to do with your shak.
It only takes a minute to create your own art work!
This is pretty amazing because 1) it’s quite beautiful really, and 2) it took less than one minute!
Source: Epic Win FTW.
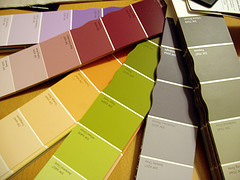
Say hello to warmer colors, and goodbye to minimalism. It
appears that several interior designers and industry insiders are saying you
should be ready to introduce color into your decor. According to Sean
O’Driscoll of the Associated Press in an article Hot Trends Of Home Design for 2008 , Minimalism is out.
“Susan Gutfreund, who designs for some of the most
expensive apartments in the U.S and Europe, said that minimalist white and
beige are being pushed out in favor of color, textures and layers. Speaking
from Paris where she is redesigning an apartment, Gutfreund said there is a
move toward warmer colors and away from the shininess and flatness of interiors
over the last few years.
In 2008, red tones take on a decidedly soft, warm feel,
such as watermelon or a carrot orange. Black and white continues to be used,
but with unexpected combinations of yellow, lime orange and fresh green,"
she said.
Janice Simonsen of IKEA Designs said
“fruit colors such
as lime yellow, kiwi and tangerine will be very popular in 2008, especially
when used in the kitchen. But blue will continue to be the number one color
choice for homeowners. In 2008, blue will be combined with camel and tan, pale green
and yellow,” she said.
Think you’re ready to try out 2008 colors but not sure
what fits your style? CALFINDER (the source for certified remodeling contractors) has an excellent post about basic color
psychology. They say,
"All too often homeowners choose colors without
understanding basic color psychology. Color impacts our mood, appetite, and
energy level. Years of color response research have shownthat certain colors
elicit specific and often strong responses."
Check out their awesome post Color
Options-Painting for a guide to help you narrow the choices when choosing
colors for your home.
Also remember you can get FREE ESTIMATES from CALFINDER for pre-qualified
contractors in your area to do the work for you when you’re ready to add that
splash of color to your life! From painting to general remodeling, to complete home renovations, they have the expert for you.
What colors do you plan to decorate with this year? Leave us a comment, we’d love to know!
Have you got some spare time this weekend, then maybe this is the right time for you to get the paint brush out and do one of those jobs that you have been putting off for some time. But with such a limited amount of time in a mere weekend, what job could be just enough to make a difference, but without taking over all of your weekend?

Well thanks to Coral Nafie from About: Interior Decorating, there are in some great projects that you may not even know about, but can be classed as a great weekend DIY job. These range from, painting walls to painting picture frames, to find out more about what makes a great weekend project, check out the Gallery.

It used it be simple choosing a favorite color, but now there is such a vast amount of choice that it is much harder now, plus everybody’s tastes change. But thanks to a great posting on HGTV finding your favorite color is easy with the David Bromstad Color Wheel it’s easy to use, just place the pointer onto the color that takes your fancy, the wheel turns and you also get an idea of your personality. Because colors and your personality often work hand in hand.
Once you have had a bit of fun with the tool, and found a color that does match your tastes, you can then get some great ideas on how to use this paint and soft furnishing color, with some fantastic design tips and ideas.

It is the simple or subtle changes that can a lot of difference to your home without breaking the bank. For a lot people it may be time, cost or both that slow done or completely stop in some cases a refurbish, but it does not have to be like that, according to Decorating for the Artistic Soul, it does not have to that hard.
Their simple advice is to use Plants, Throws, Rugs & Carpets, Paints, and the best one all just some simple but effective rearranging.

By following the points above it is possible to totally revamp your home, in few simple and easy ways, that will not break the bank or take up all of your spare time, sounds good now? Well there is no excuse to put it off anymore.
Here are ten tips for people who are a bit like me, a tightwad! Why pay someone else to do something, when you can do it yourself for a fraction of the cost. No matter how long it takes, or how many mistakes you make, there is always the feeling of deep satisfaction when you have done it yourself.
I found this over at Pioneer Thinking; they found an article by Tawra Kellam, who has put together these ten tips:

1. Check your local hazardous waste recycling center for free or low cost paint. I’ve painted many rooms and pieces of furniture just by checking their free paint section. I painted the entire exterior of our house for $45 using three of their low cost five gallon buckets of brand new but leftover construction paint.
2. Use an old sheet or spend $1.00 for one at a thrift store to use as a drop cloth. Sheets are heavier than the plastic drop cloths at the store and will last for many rooms of painting. Hang over a clothesline or fence to dry before folding and storing.
3. When removing the outlet and switch covers, put the screws back into the holes so they don’t get lost. You can also put the covers and screws in a zip top sandwich bag.
Go on over and read the rest.
What are the favorite color schemes and how do they fit into your life, the way that you choose your color schemes for certain rooms can affect your whole house or home, here are some examples.
1. Black and White – This is a classic choice, the floor tiles and white walls.
2. Blue and White – Refreshing and clean.
3. Red and White – Bold and vibrant, this choice will depend on the house and furniture.
4. Green and White – Soothing and relaxing, with yellows and greens the colors can be expanded.
5. Brown and White – This combination used to be old fashioned, but is now coming back, with creams too.
6. Tan and White – The neutral zone, where natural colors really come into their own.
7. Pastels and White – Great if used throughout the home.
8. Orange and White – Bright and cheerful, the way to light up your life.
9. Purple and White – Purple is a difficult color to get away with, but if you can it will be worth it.
10. White and White – Very bright, sometimes over whelming, but can be toned down with shades.
As you can see there are so many combinations that can be used in conjunction with the colors above.
Source [Interior Dec]
Have you ever considered having a fantastic mural on a wall in your home? Maybe in one of the kids bedrooms or possibly the bathroom, just imagine sitting there in the bath, glass of wine and views over the Italian coastline, well anything is possible with wall mural, isn’t it?
Having said that wishing to have a wall mural and getting on, maybe two different things, if you are not artistically inclined then the task would be just too overwhelming, and hiring a professional to do the job would be so expensive, but as usual there is a solution and it is not going to cost you an arm and a leg.
Wallnutz offer a very practical and inexpensive way of painting a wall mural, with their kits which contain a pattern, transfer paper, color guide and of course the instructions, you will be able to produce a fantastic eight feet wide and five and half high wall mural, all you to provide is the paint, brushes and your time.
Wallnutz description;
Your little monkey can play with friends all day long when you paint this Jungle wall mural in his room!
Size: 8′ wide by 5.5′ high, approx.
Contents: Jungle mural includes pattern, transfer paper, color guide and instructions.
Acrylic craft paints and brushes sold separately.
Price: $34.95 plus shipping.
Source [Home Improvement Ideas]
As an intriguing alternative from wallpaper there is a growing trend to use alternative techniques, one such technique is the Strie method, this is a way of adding a textured feel and look of a fabric type wall covering.
This method of wall covering is well within the skill set of even the basic DIY enthusiast which makes this type of decoration so much the better, it looks and feels expensive, yet it is something that almost anyone can do, and with relative ease.
The problem of most interior decoration schemes is that the finished product al depends on the preparation, do the preparation right by spending a bit of time cleaning and making sire that the surfaces can take the application of paint without it peeling or streaking, the rewards will be a fantastic looking newly decorate room.
Probably the most important aspect is the paint mix, you will need to mix the paint with a glaze to get the desired finish, the mix needs to be as follows, three parts paint to four parts glaze, this will give you the ideal mixture, it then needs to be applied with a six inch roller, which is worked up and down only.
Just before the glaze and pint mixture has had a chance to fully dry, it should be brushed vertically with a dry paint brush using long strokes to further the effect.
What you’ll need
* Paint for the base coat
* Paint roller
* Sandpaper and drywall compound
* Putty knife
* Drop cloths
* Painter’s tape
* Paint for the glaze coat (usually darker than the base coat)
* Glaze
* Mixing container
* Paint brush/wallpaper brush
Source [Do It Yourself]

I know it sounds pretentious, but I love Ralph Lauren paints. Great quality, great colors, and they’re only a little bit more expensive.
After the too-long trip to Home Depot, (our boy says "you guys always lie to me about Home Depot") we carelessly began sponging paint around the house, and it started looking really cool, really fast.
As soon as the first few splotches were applied, I came to the first roadblock. A nail hole. OH NO! A NAIL HOLE! We’d better spackle!
I rummaged around on the shelf where I thought I left the spackle and putty knife the last time we painted some walls, and voilà– it’s there! My handy-dandy 5 minute (30 second?) spackle can. Red Devil One Time spackle is good stuff. As long as you’re not trying to patch a hole that a watermelon could fly through, it works really well. Just spread it on until the hole is filled, and it dries in 5 minutes.
So, the first wall was all spackled and I got ready to charge off with my crazy sponge when my even-headed spouse pointed out the fact that maybe we should sand the spots first, so the texture won’t show through the paint. Luckily, I remembered something a burly construction guy once told us: "Dude, you don’t need to sand that stuff, just wipe over it with a damp towel to smooth it out. Perfect! Yet another corner cutting technique. It works beautifully–wipe the excess putty off once it’s dry, and you’re done.
I hear my crazy sponge calling me again and we’re off. Sponging has got to be one of the easiest ways to get color on a wall. Dip your sponge in the paint, and dab it on the wall. This is my kind of project. Get started up in a corner and dab away, down and out from the corner. You’ll need to cover some areas with more paint and others with less to create a uniformly uneven effect. I know it sounds silly, but that’s what works.
When you have to take a break, or if you’re working in an area where you’ve got to stop for a minute to move stuff before you trip on it, be sure that you don’t leave a hard edge where you’ve stopped sponging. Put a few individual splotches, overlapping the edge where you stopped, and a few more spots out in the yet-to-be-painted area adjacent to the break. Now you can stop. This makes it much easier to blend the new wet paint into the drier area that you’ve already done.
As we were cruising along, we came across a couple of areas that needed to be masked and also some spider webs that were long overdue for their annual demolition, but that’s about all the prep we did. A little spackling, a little masking, and nothing more.
It’s important to keep in mind that we only set out to test a little spot, just to see if that awful color was going to work and 2 hours later, we’d accidentally painted half the living room and a third of the other living room. (yes, we have a weird house). I hope yours comes out as nice as ours did; this was a great, low-budget, high-impact project for our Shak.
All we need now is one of these curvy bookshelves.
