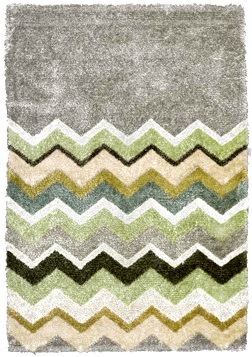
 This rug jumped out at me from this month’s Cottage Living. It’s by Natuzzi. Check their site for a dealer near you.
The Creta Rug, $1499.
Everything to do with your shak.
This rug jumped out at me from this month’s Cottage Living. It’s by Natuzzi. Check their site for a dealer near you.
The Creta Rug, $1499.
 The Twisted Bedside Table via CribCandy.
 A chromed out hot chocolate pot from AT: Kitchen.
 Orb-shaped ottomans from NotCot.
 Knitting Hands wall decal via CribCandy.
Create You Squidoo Lens On A Shak Subject And You Could Be Featured On Shakadoo! Once you have built your lens, submit it to the group HERE.
What To Do With All Those Seashells? by GypsyPirate

If you’re like me, you find it very difficult to return home from a beach vacation without at least a few shells. And, generally I lug home way more than "a few". And, this is all great and wonderful, I love seashells and love having them around me. But, eventually, you’ve got to figure out something to do with all those shells. I’ve got a few ideas that I would like to share with you.
(And, if you’re not like me and actually resist the beach combing temptation, but still want to make some of these things – you can go buy shells at a craft store.)
 Once you get your shells home, and before you do anything with them, they need to be thoroughly cleaned. I usually use a very weak (10 to 1) solution of bleach in very warm water. Put your shells in a container and cover them with the warm water/bleach and let them set for about 10 minutes or so. Then rinse very thoroughly so you’re sure none of the solution is still on them. As you rinse each one, let it on a soft towel where they can be left to dry. At some point (a few hours is good) turn them over so they dry well. There is a very thorough article outlining cleaning on About.com. They advocate a much stronger bleach solution and also give detailed advice on how to clean shells with creatures still inside. (My personal philosophy is that if there is still something living in the shell, I put the shell back, but that might just be me…)
 Now you have your nice clean shells, what are you going to do with them? You could put them in that shoebox and shove them to the back of the storage cupboard, or you could enjoy them. One of the simplest and highly effective ways to decorate with shells I ever saw was a a friends grandmother’s house. The grandmother in question had been collecting shells for decades, with one or more trips a year to the beach. She used most of the shells collected to ring a tree near her patio. By the time I saw it, the shells were an inch or two thick ringing a sizable maple for several feet. (The attached picture is not of that particular tree, but will give you the idea).
You say you want to keep your treasures inside? Well, your possibilities are truly endless. From simply arranging in a bowl or on a shelf, or around a candle. You can fill a lamp, or make a picture frame. The most important thing to remember is to enjoy yourself. When I am making or arranging something with shells, I always try to remember the last trip to the beach. And, that will always make me smile.
 You can get pretty glass trays and pillar candles in colors to match your room nearly anywhere these days. And, unless you actually live near the beach, you’ll want to get some craft sand. Once you have those elements,You’re ready to start. Place your candles on the tray, then put an even layer of sand around them, not too deep, you’re not looking to fill the entire tray. Now you can start placing your shells. If you have a large showpiece shell, place that one first. Other than that, just start with the larger of your shells you plan to use, going from the base of the candles outward. I will then usually fill in spots with smaller shells. You don’t want to try to pile too many on, or you will find that you are always trying to restack them. The accompanying photo shows a large tray with multiple candles, I have also made a nice small arrangement with a single pillar, positioned off center on a 6" base. One thing to note is you want to keep your glass candle holder simple, so that the eye is drawn to the shells. I usually choose clear glass, or a very muted green or light blue.

Amazon Price: $23.10 (as of 09/22/2007)
List Price: $35.00
Used Price: $18.25

Amazon Price: $11.21 (as of 09/22/2007)
List Price: $14.95
Used Price: $10.79


Amazon Price: $11.01 (as of 09/22/2007)
List Price: $12.95
Used Price: $6.48
 One of the easiest, and in my opinion prettiest, ways to display your shells is with a small basket of them placed on a side table or a shelf. You will want to keep your basket size proportional to the size and number of shells you have to display. Start with your larger or plainer shells on the bottom to give you a base for the smaller, prettier ones to show on top. If you have a large conch shell or starfish, angle it up from the side and back of the basket so that it can still be seen. You can also do this type of arrangement with a bowl or a tray, or, any container you choose — for my desk at work, I keep shells in a glass candy dish.
 You can stay as simple or get as fancy as you like with a picture frame. For ease of completion, I would say to start with one that is already finished for your first effort. Wood is a better material for the frame to be made of, but you can go with any color or finish, but simple will look better in the end. While you might be able to use this idea with a metal or plastic frame, you will likely be much happier with the results on a wood frame. Once you have selected your frame, choose some complimentary shells that you want to attach to it. You can go all the way around it, some just at the bottom, the four corners, or however you like. Work over newspaper to protect your surface and use your hot glue gun for this project. You will be much happier with your finished product if you do a dry placement of the shells before gluing them in place. Once you know where the shells will go, begin gluing them around the frame. (BE CAREFUL: Hot glue guns can burn you, exercise caution when using one.) Even though hot glue does dry quickly, to ensure you don’t have any problems, allow your new frame to sit over night before placing on display. For your next venture you might want to consider a frame you finish or paint your self to get a truly customized look. You will be amazed at the wide selection your local craft store will have. The possibilities are limitless. You can also decorate the edges/frame of a mirror with shells.
 I love the look of a shell wreath, but was intimidated to try one as I was sure they were too complicated. But, it doesn’t have to be. For a project like this, more than any of the others, you should have a large number of consistently sized shells to start with. For your first wreath, go small, get an 8" or 10" foam wreath base from your craft store. Because I don’t want any white to show through, I would say to give it a quick coat of a light colored spray paint. Another necessary tool is a hot glue gun. I can’t imagine having made a wreath of any type without one. I suggest you lay out all of your shells that you want to use near your work area so you can see what you have to use. (It might also be helpful to arrange them in a circle to play with size and color placement.) Start at the top, gluing your shells in place as you go around, filling in around the circle once, then going back in for your next row. (BE CAREFUL: Hot glue guns can burn you, exercise caution when using one.) Once you have the front of your wreath filled in with shells, you’re nearly done. You can now add some ribbon all the way around the wreath, or simply an accent bow. Turn your wreath over and attach a wire hanger into the back and secure with a dab of hot glue. Even though hot glue does dry quickly, I would suggest you still let your wreath set overnight before hanging it. Now, just sit back and enjoy…and start planning your next wreath.
I found these beautiful shell wreath photos on Flickr. See if any of these give you inspiration for your own creation.
To learn everything you ever wanted to know about pumpkins, visit the entire lens by clicking: What To Do With All Those Seashells?

 Living in Texas means landscaping with succulents. They’re hearty, drought-resistant little plants that make great ground cover and are often evergreen.
Potted succulents have been popular the last few years because their unusual, iconic shapes really compliment modern decor. But I’d never seen a floral arrangement that spotlights succulents until I found this slide show on the Southern Accents site.
Isn’t this gorgeous?
 Is there a woman who doesn’t fantasize about a room-sized walk-in closet? If I ever have one, I know it will need one perfect chair. And here it is.
Nailhead detailing anchors this feminine slipper chair from Windsor Smith Home.
The Harlow Tufted Slipper Chair, $1800-$2400.

The great thing about Etsy is finding something one-of-a-kind that you didn’t even know you were looking for. The bad thing about Etsy is that you rarely know what you’re looking for.
That ambiguity can make surfing for your next favorite thing tricky and frustrating.
But, take a look at their color search option. The interface is a series of colored dots. When you mouse-over them, they expand, leaving a trail of rainbow dots flowing behind your mouse.
When you click a dot, you get a thumbnail photo of all the Etsy items in that color range. Click a thumbnail gives you product details. And when your done, you can just toss the item icon aside and it flies off the page.
Very fun and very addictive.
Create You Squidoo Lens On A Shak Subject And You Could Be Featured On Shakadoo! Once you have built your lens, submit it to the group HERE.
Design Your Own Gothic Bedroom by rms

Do you want to sleep in a medieval castle? Do you love the Gothic look? Take a scroll through my Gothic Bedroom Design page for ideas, options, and how-to advice for your own Gothic bedroom. You’ll find links to the right bedding, color combinations, faux painting tips, decor accessories, candlabras, and books to help you get that Medieval Gothic look just right!
 My love of the old Dracula movies inspired me to design my own Gothic bedroom. I so much admired the medieval looking decor that I started really looking at how those castle bedrooms were decorated.
The first thing I noticed was the candelabras. Before electricity that was their only form of lighting. For a proper Gothic bedroom you definitely need a great candelabra.
Color scheme is a bit difficult to detect in the old black and white movies but I’ve found that rich reds, royal purples, deep blacks,satiny golds, and all of the gem colors, work very well. Your bedding pattern must be of a regal design, stripes or crests, or simply solid colors with lots of velvet, lace, and fringe work. The large 4 post bed should be topped with a lacy canopy, or fringy drapes and have an assortment of billowy pillows on it.
Wrought Iron adds a touch of the ancient. Crosses and over door decorations should all be made of wrought iron, or look like it is.
Of course you will still want the modern conveniences of electricity but be sure that it doesn’t stand out too much. You can find Gothic looking lamps with scroll work on the bases and even in the upper lighted areas. You can even find lamps and ightbulbs that resemble candles.
Your pictures and accessories should not have a modern look. Think Medieval paintings – swords, dragons, crests, Kings, and Queens. Since my room is based on Dracula, I have a great picture of a vampire, ready to sink his teeth in, at the side of my bed.
The most important thing to remember is to have fun designing your Gothic bedroom. Watch the old movies, study the medieval designs in books and start designing your own castle hideaway!
Can’t be too safe now, can we?
 Your Gothic bedroom should have an old look and feel to it. Think dark and dusty without it actually being dirty and filled with cobwebs. Believe it or not, you can acquire this look with a new coat of paint.
To get started you need to choose a paint color that compliments your bedding and taste. While a Gothic bedroom should be dark, black paint on the walls isn’t neccessary. I’d try to go with tones of a dusty white, sepia, or gray. Stay away from anything bright or flourescent.
I chose to use a nuetral color with a slight golden tone to it as the back color in my bedroom, to match the gold in my bedding and curtains, and a brownish colored paint for the accent, but I believe this technique will work with any color you like.
Once you’ve chosen your wall color, you’ll need to choose an accent color. This color should be in the same family as your chosen wall color,but a shade or two darker. You can also go with a dark gray, or if you’ve chosen a fairly dark color for your walls, you might want to use black. Test the colors to see if they go together using the paint chip samples at your local paint store.
Once you’ve got your colors, paint the entire room with the lighter color. Depending on the type of paint you use, this usually takes two coats.
After the paint on your walls is completely dry, comes the fun part! Using a very thin artist’s paint brush, or the edge of a folded piece of sturdy paper, paint thin, uneven lines to look like cracks onto your walls, running from the top corners (where two walls meet the ceiling) in varying lengths, no more than 1/4 of the way down the walls. In order to keep your cracks realistic looking, don’t go all the way to the floor. If a real wall cracked like that, it would crumble and cave in.
As you paint the lines (cracks) down the walls, keep your paint brush on the dry side, and don’t re-wet your brush until you start a new line. The lines should appear darker and fuller near the ceiling and fade away as they descend down the wall, just like actual cracks do.
Do this in all four corners of your room, but don’t make the cracks look symetrical, and keep the lines thin. Each corner should have it’s own unique look. If you like, you can paint a few "cracks" in the center of the walls, starting from the ceiling, but I don’t recommend you do too many. Sometimes, less is more and in this case less cracking will look much more realistic.
 Throughout this page there are pictures and descriptions of Gothic and Medeval Bedrooms to help you get a good idea of what a Gothic Bedroom should, or could, look like.
Although these pictures are limited to what the camera caught, your own Gothic bedroom ideas are limitless. Use these photos and your own imagination to create your unique interpretation of a proper Gothic bedroom.
Have fun with it!
 Your Gothic bedroom window treatments should be long, full, and billowy with sheer panels of lace peeking out through satiny, or velvet, curtains. They should flow and flutter with the breeze of an open window and yet look majestic when sitting still.
Your curtain colors should be the same rich colors as your bedding or something similar that will compliment them. Think ruby red, black, gold, or deep purples, and maroons.
I chose liquid gold curtains with black lace and a valance that matches my comforter with black jacquard stripes over gold. I’m very pleased with the color combination and the antique look of the lace curtains. (I got my lace curtains at Big Lots, believe it or not. It’s like they say in their commercials, you never know!)
To add to the medieval look of your Gothic bedroom windows, you might look for scrolling, or crescent shaped, wrought iron door toppers and attach them to the walls just about your curtains. I found some great scrolling door toppers at Kirklands for my own room and placed them not only above the curtains but over each of the doors too. They give the walls a taller appearance and add to the mystique and majesty of the room.
(Lace image from www.costumes.org)
 This is a wonderful depiction of a gothic bed.
The bed itself is made of wrought iron and is available through Thewroughtironco.com.
I love the way the canopy works as the crowning glory of this beautiful bedroom layout. In my opinion the drape behind the bed brings everything together.
The opposing colors of the pillows work well too.
To learn everything you ever wanted to know about designing your own gothic bedroom, visit the entire lens by clicking: Design Your Own Gothic Bedroom

I planning to start writing Santa today in hopes of getting one of these for Christmas.
This custom cabinet is from Ilan Dei Studio.
Via Design Milk.
 The Q Collection (makers of furniture safe for people and the planet) have introduced the Q Collection Junior.
The cute designs meet some of the toughest environmental standards out there. That means organic, non-toxic, the whole kit and caboodle.
Plus, this stuff is designed with usability and kids’ safety in mind.
Shown here, Stella Stackable Storage, $300-$350 per piece.
 House Beautiful has a very helpful slide show containing 50 of their favorite bathroom items.
I’ve been searching for new towels lately, so I was glad to see them recommend Thomas O’Brien’s towels for Target, $6.99-$9.99.
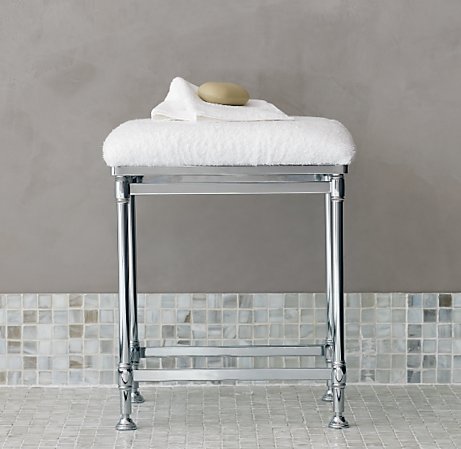
I also like the Newberry bath stool at Restoration Hardware, $199.
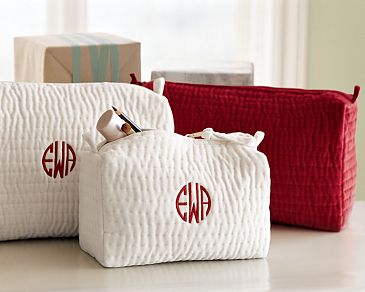
And when I was at Pottery Barn this weekend, I saw the large quilted velvet cosmetics bag embroidered with the word "Guest" and filled with guest towels and toiletries. Very cute.


